This Gluten Free Sourdough Pie Crust is a game changer—rich, buttery, and perfectly flaky. It works beautifully for both sweet and savory pies.
To make this crust, you will need gluten-free sourdough discard, ideally from a superfine brown rice or sorghum flour starter. Don’t have a gluten-free starter yet? Check out my guide on How to Make a Gluten Free Sourdough Starter to get started.
You can find the chicken pot pie filling recipe here.

As an Amazon Associate, I earn from qualifying purchases. This post contains affiliate links for products I use and love. You can read my full disclosure here. All thoughts and opinions expressed are my own. Thank you for supporting Wonders of Cooking so that I can continue to provide you with free gluten-free recipes.
Looking for more Gluten Free Sourdough recipes?
- Sourdough Chocolate Chip Cookies | Gluten Free Sourdough Discard Recipes
- Gluten Free Sourdough Banana Bread | Sourdough Discard Recipes
- Gluten Free Sourdough Bread Recipe | Dutch Oven Method
- Gluten Free Sourdough Discard Crackers | Best Gluten Free Cracker Recipe
- Gluten Free Sourdough Pizza Crust - Best Sourdough Discard Recipes - one of my favorite ways to use up discard!
- Gluten Free Sourdough Cheddar Biscuits | Best Sourdough Discard Recipes
- Gluten Free Sourdough Poptarts Recipe | Brown Sugar and Cinnamon - Uses this same crust!
- Gluten Free Sourdough Poptarts | Homemade Strawberry Poptarts - Uses this same crust!
How to make the best
- For savory recipes, you can use older discard or let the dough ferment overnight in the fridge.

What is sourdough discard?
Sourdough discard is the portion of starter removed before each feeding. Instead of tossing it, store it in a jar in the fridge. The discard is considered inactive because the wild yeast and bacteria have already consumed all the available food in the flour and water, and no new nutrients are added.
Since it’s no longer "active", discard works perfectly in recipes that don’t require much rising—like brownies, cookies, banana bread, quick breads, crackers, and more.
This pie crust is one of my favorite ways to use up gluten-free sourdough discard.

What are the benefits of eating gluten free sourdough?
Sourdough is celebrated for its health benefits. While it does contain gut-friendly bacteria like lactobacillus, the probiotics don’t survive baking, so they won’t provide a direct probiotic boost. However, as a fermented food, sourdough’s wild yeast and bacteria pre-digest the starches in the flour, making it easier to digest and potentially helping to keep blood sugar levels more stable. For these reasons, sourdough is thought to support gut health.
For those with Celiac Disease (like me), we often rely heavily on rice in many forms. Sourdough offers a chance to enjoy a wider variety of grains—such as sorghum, millet, or buckwheat—adding both flavor and diversity to the diet.

Gluten Free Sourdough Pie Crust Ingredients:
- Gluten-free sourdough discard (the unfed portion removed from the starter, up to two weeks old). Use cold discard in this recipe to make the pie crust even colder, which helps with flakiness.
- High quality gluten-free all purpose flour containing xanthan gum. Tested and photographed with Bob's Red Mill GF Baking Flour (the blue bag).
- Unsalted butter, cold from the fridge
- Granulated sugar
- Vinegar or freshly-squeezed lemon juice. Don't skip this! It makes the pie crust tender and flaky. Even though this is a sourdough crust, it still needs the vinegar/lemon. It will not make the pie crust overly sour.
- Milk, or dairy-free milk. Milk fats help provide a richness in flavor and aid the crust in turning golden brown.
- Salt
- An egg wash (1 egg + 1 tablespoon milk)
Want to make a chicken pot pie with this crust like I did? Here's the recipe for the filling.

How to Make Gluten Free Sourdough Pie Crust:
- Preheat the oven to 425 F.
- In a large mixing bowl, combine the gluten-free flour, sugar, and salt, whisking until well blended.
- Add the cold, cubed butter and use a dough cutter to work it into the flour until the mixture resembles small peas. Don’t have a dough cutter? You can grate the cold butter with a cheese grater.
- Stir in the sourdough discard, vinegar or lemon juice, and 1 to 2 tablespoons of milk with a fork until the mixture forms large crumbles. Then, use your hands to press the dough together, adding extra milk one tablespoon at a time as needed, until it forms a cohesive ball or disc (I used 5 tablespoons total). The dough will feel dense and compact but will bake into flaky layers.
- Wrap the dough in plastic wrap and chill while preparing the pie filling—at least 20 minutes. It can also be chilled overnight, or up to 2 days. Chilling overnight allows the dough to ferment longer, creating a slightly tangy flavor, which works well for savory pies. Avoid long fermentation for sweet pies with delicate flavors like cinnamon or lemon.

After the dough has chilled:
- Use a dough cutter to divide the disc into sections—cut into 4 pieces for mini pies (top crusts only). Note: For a standard 9-inch top or bottom crust, cutting isn’t necessary.
- Place a piece of parchment paper on the counter and set one section of the dough on top. Cover with another piece of parchment paper, then roll out the dough with a rolling pin to the width of the pie pan, ideally ¼-inch thick. The parchment prevents sticking and makes it easy to lift and transfer the rolled-out dough into the pie pan.
- Remove the top piece of parchment and set it aside. Carefully lift the bottom parchment to position the crust over the filled pie pan, then seal the edges with the tines of a fork.

- Repeat with any remaining sections of dough.

- For the Egg Wash: Whisk together the egg and milk in a small bowl. Use a pastry brush to coat the top and edges of the pie evenly.

- Bake for 30 to 45 minutes, keeping a close eye on the pies, until the filling is bubbling (165 F) and the crust is golden brown. Mini pies will bake faster, about 25 to 40 minutes. If the crust starts to brown too quickly, tent with foil.
- Let the pie cool completely before storing or serving. For pot pies, enjoy them warm.

Equipment
You only need basic kitchen tools to make this Gluten Free Sourdough Pie Crust. I recommend:
- A glass pie dish (ceramic works, too) or mini pie pans (my favorite for chicken pot pie as well as cobblers/crisps). I bought the Pioneer Woman mini pie pans, but they're currently out of stock.
- A French rolling pin. I recommend French rolling pins for gluten-free baking because they have tapered ends, meaning it won't leave any imprints or get stuck on the dough.
- A dough cutter for cutting the dough into sections, if needed.
- A basting brush for the egg wash.
- Parchment paper is always a must when rolling out gluten-free dough. It's seriously a lifesaver.
- Don't want to make a starter from scratch? This Sourdough Starter Culture packet gives you a head start with a dehydrated gluten-free sourdough starter culture and directions to follow to maintain it for years to come. I love this website because there's also cheesemaking, yogurt, kombucha, and fermented vegetable kits. (Use the code WONDERS15X on Cultures For Health's website to get 15% off!) The GF starter is also available for purchase on Amazon here.

How to Store Gluten Free Sourdough Pie Crust:
Gluten Free Sourdough Pie Crust can be stored at room temperature or in the refrigerator, depending on your recipe. For example, chicken pot pies should be refrigerated, while a cherry pie is fine at room temperature.
If reheating a refrigerated pie, bake at 350°F to restore crispness and flakiness. For mini chicken pot pies, I reheated them for 25–30 minutes at 350°F. Tent with foil if the crust starts to brown too quickly.
Unbaked pie crust can also be frozen for up to 3 months, making it perfect for preparing ahead of time for holidays. Simply thaw in the refrigerator overnight before rolling out.

Notes on Gluten Free Sourdough Pie Crust:
- For savory recipes like my Gluten Free Chicken Pot Pie, I prefer using older sourdough discard (aged 2–3 weeks) to achieve a classic sourdough tang. If you don’t have aged discard, you can ferment the dough in the refrigerator overnight or up to 2 days to develop a similar flavor.
- For the mini pot pies, I used only a top crust, about ¼ inch thick—perfect for flakiness and texture.
- The chicken pot pie filling recipe will be coming soon!
- P.S. The “mama pie” in the oven is my chicken pot pie made with a regular gluten-free pie crust (not sourdough)—that recipe is coming soon, too!

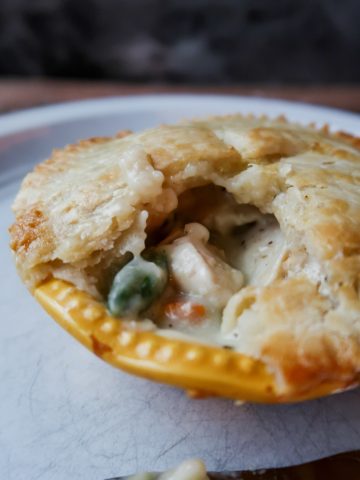
Can you tell how flaky the outside is while the inside of the pot pie has that quintessential gravy-saturated, soft and tender bite? I'm sad I already finished this pie.

Did you make this Gluten Free Sourdough Pie Crust? Leave a 5-star Rating Below!
You can also join my Facebook group, Gluten Free Sourdough Baking Recipes and Advice, to share recipes, post photos, and get advice in live time. Currently we have 19,000 members and growing!

Gluten Free Sourdough Pie Crust - Sourdough Discard Recipes
Your rating helps support the making of more tested, delicious gluten-free recipes.
Equipment
- mini pie pans optional
Ingredients
For the gluten free sourdough pie crust:
- 1 ¼ cup high quality gluten-free all purpose flour containing xanthan gum I used Bob's Red Mill GF 1:1 Baking flour (the blue bag) Do not use flours with chickpea/garbanzo bean flour.
- ½ cup cold gluten free sourdough discard
- 8 tablespoon cold unsalted butter, cubed
- 1 teaspoon vinegar or freshly-squeezed lemon juice helps with flakiness
- 2-6 tablespoon milk or dairy-free milk
- ½ teaspoon granulated sugar
- ½ teaspoon salt
For the egg wash:
- 1 large egg
- 1 tablespoon milk
Instructions
- Preheat the oven to 425 F.
- In a large mixing bowl, combine the gluten-free flour, sugar, and salt, whisking until well blended.1 ¼ cup high quality gluten-free all purpose flour containing xanthan gum, ½ teaspoon granulated sugar, ½ teaspoon salt
- Add the cold, cubed butter and use a dough cutter to work it into the flour until the mixture resembles small peas. Don’t have a dough cutter? You can grate the cold butter with a cheese grater.8 tablespoon cold unsalted butter, cubed
- Stir in the sourdough discard, vinegar or lemon juice, and 1 to 2 tablespoons of milk with a fork until the mixture forms large crumbles. Then, use your hands to press the dough together, adding extra milk one tablespoon at a time as needed, until it forms a cohesive ball or disc (I used 5 tablespoons total). The dough will feel dense and compact but will bake into flaky layers.½ cup cold gluten free sourdough discard, 1 teaspoon vinegar or freshly-squeezed lemon juice, 2-6 tablespoon milk
- Wrap the dough in plastic wrap and chill while preparing the pie filling—at least 20 minutes. It can also be chilled overnight, or up to 2 days. Chilling overnight allows the dough to ferment longer, creating a slightly tangy flavor, which works well for savory pies. Avoid long fermentation for sweet pies with delicate flavors like cinnamon or lemon.
After the dough has chilled:
- Use a dough cutter to divide the disc into sections—cut into 4 pieces for mini pies (top crusts only). Note: For a standard 9-inch top or bottom crust, cutting isn’t necessary.
- Place a piece of parchment paper on the counter and set one section of the dough on top. Cover with another piece of parchment paper, then roll out the dough with a rolling pin to the width of the pie pan, ideally ¼-inch thick. The parchment prevents sticking and makes it easy to lift and transfer the rolled-out dough into the pie pan.
- Remove the top piece of parchment and set it aside. Carefully lift the bottom parchment to position the crust over the filled pie pan, then seal the edges with the tines of a fork.
- Repeat with any remaining sections of dough.
- For the Egg Wash: Whisk together the egg and milk in a small bowl. Use a pastry brush to coat the top and edges of the pie evenly.1 large egg, 1 tablespoon milk
- Bake for 30 to 45 minutes, keeping a close eye on the pies, until the filling is bubbling (165 F) and the crust is golden brown. Mini pies will bake faster, about 25 to 40 minutes. If the crust starts to brown too quickly, tent with foil.
- Let the pie cool completely before storing or serving. For pot pies, enjoy them warm.
Notes
-
- Be sure to double this recipe if you need both a top and bottom crust. This recipe makes a single crust.
-
- For the mini pot pies, I used only a top crust, about ¼ inch thick—perfect for flakiness and texture.


Chris L.
Loved!