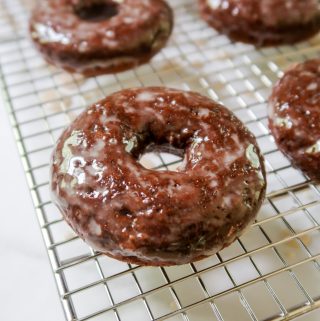
Gluten Free Chocolate Donuts with Easy Glaze
Your rating helps support the making of more tested, delicious gluten-free recipes.
Yield: 12 donuts
These gluten-free donuts are fun to make, easy, and super tasty. Tender and moist chocolate donuts that are then dipped into an easy homemade glaze and left to harden. Best eaten fresh within the same day.
Print
Pin
Share
Save
Ingredients
For the Donuts:
(Dry Ingredients)
- 1 cup high quality gluten-free all purpose flour containing xanthan gum Tested only with rice-based flours, I use either Bob's Red Mill GF 1:1 Baking Flour or King Arthur's Measure for Measure
- ½ cup light brown sugar packed
- ¼ cup unsweetened cocoa powder I used Hershey's
- 1 teaspoon baking powder
- ¼ teaspoon baking soda
- ¼ teaspoon salt
(Wet Ingredients)
- ¾ cup milk or dairy-free milk like almond milk
- 3 tablespoon unsalted butter
- 1 large egg
- 1 teaspoon pure vanilla extract
For the Glaze:
- 2 cups powdered sugar
- 1 teaspoon pure vanilla extract
- 5-6 tablespoon milk or dairy-free milk like almond milk
- a pinch of salt
Instructions
For the Donuts:
- Preheat oven to 350 F. Grease the donut pan with a nub of butter or cooking spray. Set aside.
- Add the dry ingredients to a large bowl: GF flour, baking soda, baking powder, cocoa powder, light brown sugar, and salt. Whisk until combined.
- Add in the wet ingredients: melted butter, milk, egg, and pure vanilla extract. Stir until combined, scraping down the sides of the bowl. Do not over-mix.
- Using a small spoon, carefully fill the cavities of the donut pan about ¾ of the way full. Be careful to not place any batter on the hole cutout or else they will not be donut shaped. Wipe away excess. Note: Alternatively, you can add the batter to a plastic storage bag or piping bag, cut a small hole at the tip, and squeeze the batter into the donut wells. I just prefer the spoon method as there is less waste and cleanup.
- Bake for 10-12 minutes. Donuts should be springy to the touch.
- Allow donuts to cool 5 minutes in pan, then remove to a wire cooling rack and allow to cool completely.
For the Glaze:
- Combine all of the ingredients in a small bowl, and whisk until smooth. Tip: Be sure to sift your powdered sugar first, this ensures there are no lumps and will make whisking much faster.
To Glaze the Donuts:
- Place parchment paper or paper towels underneath of the donut cooling rack (this will catch drips later on and prevent a mess).
- Once donuts are completely cool, dunk the top of each one into the glaze. Allow the excess to drip off into the bowl. Then, place on the wire rack. Repeat with remaining donuts.
- Allow the glaze to harden for about 20-40 minutes. Tip: If you want really shiny "white dusted" donuts, you will need to glaze them twice. At about the 20-minute mark, dunk the top of the donuts once more into the glaze. Set aside an additional 20-30 minutes to harden.
- Serve.
Notes
Storage Instructions:
The only bad thing about donuts is that they are best eaten fresh the same day that they are made. If left overnight, the glaze will soak into the donuts and become practically invisible. The donuts will still be moist, but they won't have the same taste.
I highly recommend making the amount of donuts that can be eaten in one day (i.e. cut the recipe in half if you only need six). Or, you can store the donuts without the glaze and make a smaller batch of the glaze fresh the following morning. Store any donuts in an airtight container for 1-2 days.
Did you make this recipe?Mention @wondersofcooking or tag #wondersofcooking!