Gluten Free Sourdough Bread Bowl Recipe | Sourdough Discard Recipe
Your rating helps support the making of more tested, delicious gluten-free recipes.
Yield: 4 large sourdough bread bowls
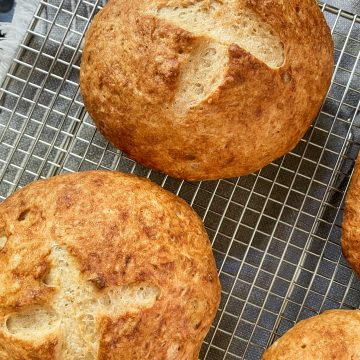
Beautiful golden brown and chewy gluten free sourdough bread bowls with a pillowy soft interior. They're also dairy-free and vegan (apart from an egg wash, which can be replaced with oil.)Simply ladle in your favorite soup or hearty chili, and you’ve got a perfect pairing that feels like home in every bite.
Print
Pin
Share
Save
Equipment
- stand mixer optional
Ingredients
Psyllium Gel:
- 40 g whole psyllium husk not powder
- 585 g warm water, between 100 to 110 ℉
Dry Ingredients:
- 144 g tapioca starch or cornstarch or arrowroot
- 144 g potato starch or cornstarch or arrowroot
- 155 g brown rice flour
- 100 g sorghum flour or oat flour, light buckwheat, or white teff
- 30 g granulated sugar
- 12 g instant yeast I use Fleischmann's RapidRise
- 16 g salt
Wet Ingredients:
- 270 g gluten-free sourdough discard preferably from a 1:1:1 brown rice flour or sorghum flour starter
- 30 g olive oil
- 16 g apple cider vinegar
- 1 large egg for the egg wash
Instructions
- Prepare a large cookie sheet by greasing with nonstick cooking spray, or lining with parchment paper. Set aside.
- Make the psyllium gel: In a medium bowl, combine the psyllium husk and warm water. Stir well, then set aside to thicken into a gel.40 g whole psyllium husk, 585 g warm water, between 100 to 110 ℉
- In a large mixing bowl, whisk together the dry ingredients. Use the back of a measuring cup to create a well in the center of the mixture, then set aside.144 g tapioca starch, 144 g potato starch, 155 g brown rice flour, 100 g sorghum flour, 30 g granulated sugar, 12 g instant yeast, 16 g salt
- Stir the sourdough discard, vinegar, and oil into the psyllium gel, then pour the mixture into the well of the dry ingredients.270 g gluten-free sourdough discard, 30 g olive oil, 16 g apple cider vinegar
- Gradually work the dry ingredients into the wet, kneading until the dough is smooth, about 5 to 6 minutes. The dough should be slightly sticky to the touch but easy to handle and able to hold its shape. Avoid adding extra flour unless absolutely necessary. Once kneaded, shape the dough into a ball.
- Lightly flour a clean work surface and place the dough ball on top. Use a dough cutter to divide it into four wedges. For accuracy, weigh each portion to ensure they’re about 380 grams each.
- Working with one wedge at a time, knead and shape the dough into a ball, pinching and smoothing any seams closed at the bottom. Gently squeeze the dough upward as you shape to create a taller, rounded form—this extra height helps maintain structure as the dough settles during rising, resulting in better-shaped bowls.
- Repeat with remaining dough. Then, transfer the shaped dough balls to the prepared baking sheet, spacing them a few inches apart from each other and the edges of the pan.
- Cover the dough with plastic wrap or a warm, slightly damp tea towel, and set it in a warm spot to rise until noticeably puffy and about doubled in size, about 1 hour.
- About 30 minutes before the dough has finished proofing, preheat the oven to 425°F. Position the oven rack in the middle, and place a cast iron skillet or heavy-duty baking tray (avoid ceramic or glass) on the lowest rack.
- For the egg wash: Whisk an egg in a small bowl. When the dough is puffy, brush the egg wash evenly over the surface.1 large egg
- Using a bread lame or a sharp knife, score an X into the center of each bread bowl to let steam escape.
- Put the bread bowls in the oven, add 5 ice cubes to the cast iron skillet, then quickly close the oven door and reduce the temperature to 400°F. Bake for 15 minutes.
- After 15 minutes, open the oven door to release the steam and carefully remove the bottom skillet. Continue baking for another 25-30 minutes, until the bread turns golden brown. *Keep an eye on the bottoms after the 25-minute mark, so they don't start to burn.
- Remove from the oven and transfer to a wire cooling rack. Allow to cool at least 30 minutes before cutting the tops of the bread bowls. To cut the top off your bread bowl: Use a serrated knife and angle it slightly inward as you cut a circle about 1 to 2 inches in from the edge—think of carving the lid of a pumpkin. (You can always widen the opening later if needed.) Gently lift off the top and set it aside to serve alongside the bread bowl for dipping. Then, use your fingers or a spoon to carefully hollow out the inside, leaving about a ¾-inch wall around the bottom and sides. This keeps the bread bowl sturdy and prevents any soup from leaking through.
- Ladle your thick soup or chili inside. Enjoy!
Notes
*Substitution ingredients in the Ingredient Notes section may turn out with a bread that is slightly different in color or texture than the blog photographs.
*Nutrition information is an estimate and may vary based on ingredients and preparation.
Calories: 700kcal | Carbohydrates: 141g | Protein: 12g | Fat: 11g | Saturated Fat: 2g | Polyunsaturated Fat: 2g | Monounsaturated Fat: 7g | Trans Fat: 0.01g | Cholesterol: 41mg | Sodium: 1600mg | Potassium: 605mg | Fiber: 14g | Sugar: 10g | Vitamin A: 59IU | Vitamin C: 1mg | Calcium: 74mg | Iron: 3mg
Did you make this recipe?Mention @wondersofcooking or tag #wondersofcooking!