This Pumpkin Pie Recipe is easy, and seriously delicious. I use my easy Gluten Free Pie Crust recipe, but you can easily substitute it for your favorite crust.
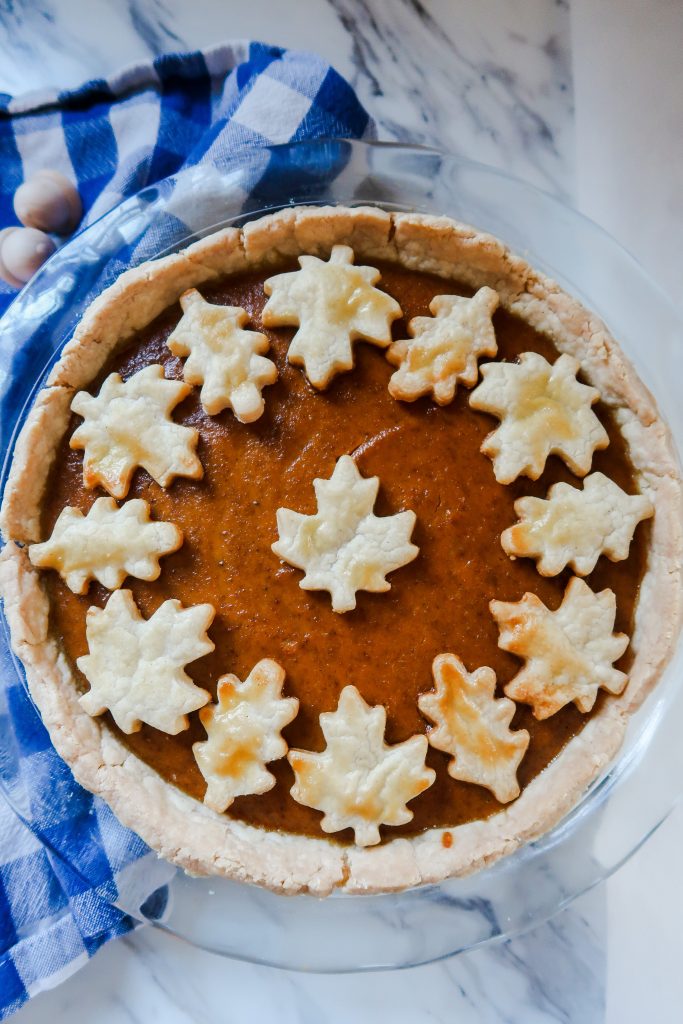
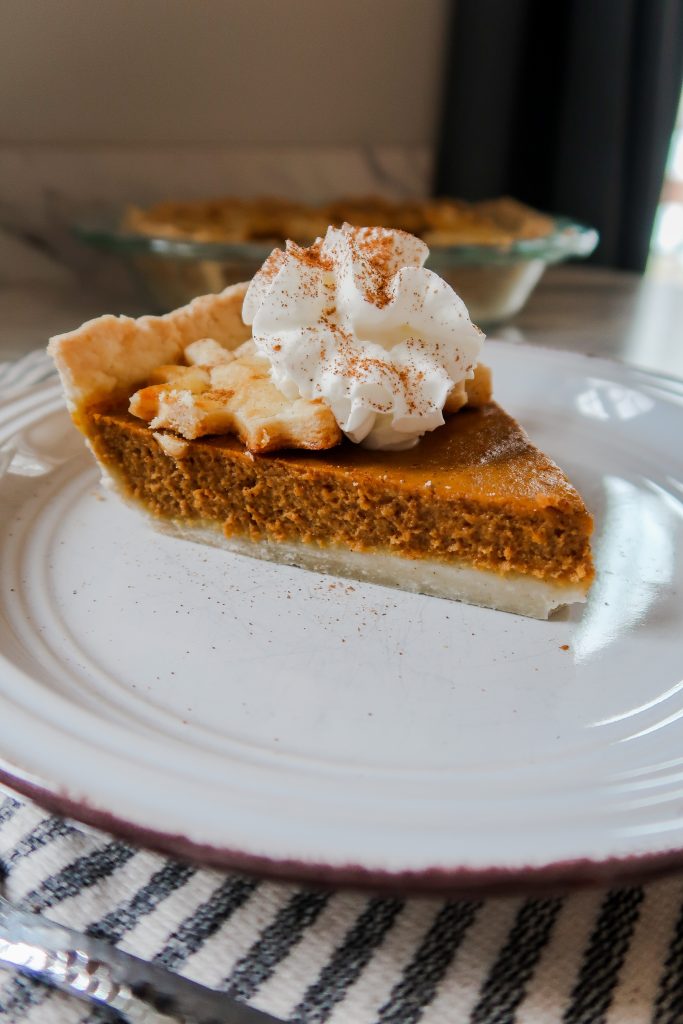
The creamy pumpkin pie filling is perfectly spiced with cinnamon, cloves, ginger, nutmeg, and allspice. The spices of Fall. Paired with a no-frills quick-to-make gluten-free pie crust recipe, and topped with whipped cream and a dash of cinnamon. I decorated the top with leaves made of pie crust for an extra special holiday touch.
Pumpkin pie is a holiday classic. You'll want to make this recipe for Thanksgiving, Christmas, and whenever you just get that hankering.
Jump to Recipe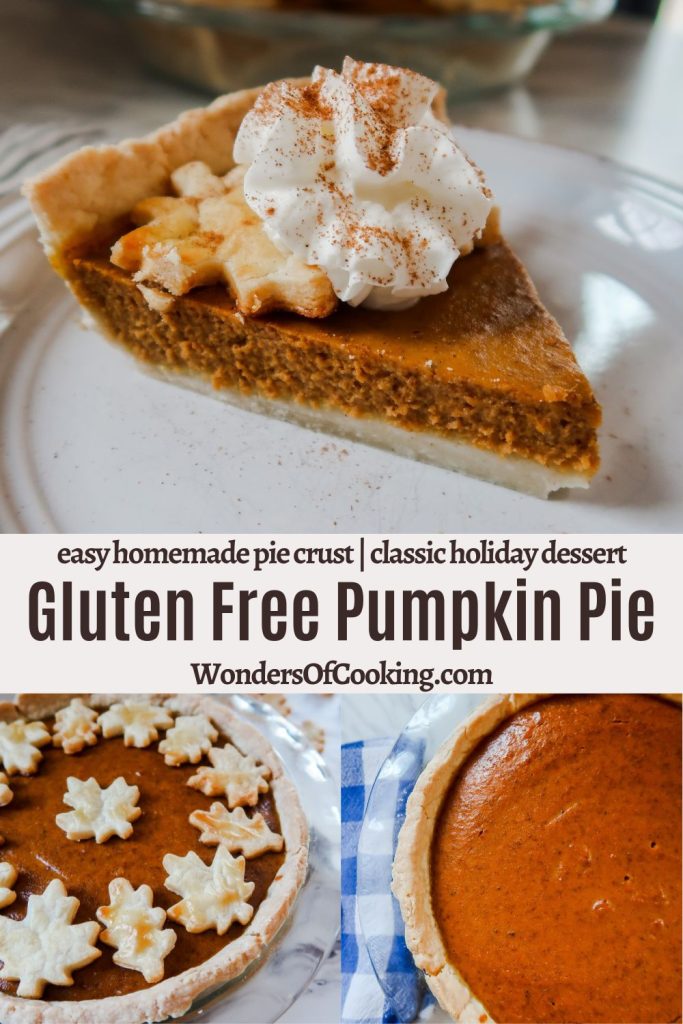
As an Amazon Associate, I earn from qualifying purchases. This post contains affiliate links for products I use and love. You can read my full disclosure here. All thoughts and opinions expressed are my own. Thank you for supporting Wonders of Cooking so that I can continue to provide you with free gluten-free recipes.
Looking For More Gluten Free Desserts?
- Gluten Free Blueberry Pie | The Best Gluten Free Pie Crust
- Chocolate Pudding Pie with Gluten Free Pie Crust Recipe
- Chicken Pot Pie Recipe | The Best Chicken Pot Pie Filling
- Apple Hand Pies with Gluten Free Pie Crust Recipe
- Apple Pie Filling Recipe | Easy Homemade Pie Filling
- Strawberry Crisp | Easy Summer Dessert | Gluten Free
- Cherry Crisp with Sliced Almonds - Gluten Free Baking
- Pumpkin Muffins | Gluten Free Muffins with Cream Cheese Drizzle
- Pumpkin Cake with Cream Cheese Frosting | Gluten Free

What Makes This Gluten Free Pumpkin Pie Recipe So Good?
- Pumpkin puree. We're talking 100% pumpkin, baby. I use the organic Thrive Market brand - I find it's super fluffy.
- Half & half, or heavy cream.
- Light brown sugar. This makes everything amazing.
- Eggs and an egg yolk. This is crucial to this pumpkin pie to get the custard texture.
- Pure vanilla extract.
- Cinnamon.
- Cloves.
- Ginger.
- Nutmeg.
- Allspice.
- Pie crust made with high-quality gluten-free all-purpose flour (I used Bob's Red Mill GF 1:1 Baking Flour, the blue bag), butter, salt, and milk.
- Toppings like whipped cream and cinnamon. Optional: You can decorate the top of your pie with additional pie crust, as I did.

How to Make my Pumpkin Pie Recipe:
For the Gluten-Free Pie Crust:

- Prepare a 10-inch pie pan by greasing it with a pat of butter or cooking spray.
- Combine flour and salt in a medium-sized mixing bowl.
- Cut butter into flour mixture until the butter resembles small peas. Add the milk in intervals, a few tablespoons at a time. Work the milk into the flour and butter mixture until it forms a ball. If the flour is too dry and crumbly, add a tablespoon more milk at a time.
- Once the dough has formed a ball, cut two large pieces of parchment or wax paper. Lay the first piece of parchment paper on the countertop, and place the dough ball on top of it. Then, lay the second piece of parchment paper on top of the dough ball. Use a rolling pin to roll out the dough until it's about 10 inches across, in length and width.
- After the dough has been rolled out, peel back the top layer of parchment paper and discard. Then, place the prepared pie pan on top of the dough. Place one hand under the bottom layer of parchment paper and one hand on the bottom of the pie pan. Flip the pie pan so it's right-side up and the pie crust is inside. Carefully press down into shape and peel back the parchment paper. Smooth over any cracks in the pie crust. You can also pinch a design into the edges of the crust.
- Set aside.
Important: Do not pre-bake this pie crust. Leave raw and set aside.
To make Decorative Pie Crust Shapes:

- Roll out the dough to ¼-inch to ½-inch thick.
- Press miniature cookie cutters into the dough to make shapes, then pull away the scraps. You can re-roll the scraps and re-cut more shapes as needed.


- Important: Do not bake decorative pie crust shapes on top of the pie. They will sink into the pumpkin pie filling, move around, etc. Instead, bake decorative pie crust shapes on a separate sheet pan. After the pumpkin pie has cooled, then you can place the (cooled) decorative pie crust shapes onto the pumpkin pie in any pattern you like.
For the Gluten Free Pumpkin Pie Filling:

- Preheat oven to 350 F.
- In a large-sized mixing bowl or bowl of a stand mixer, add all of the pumpkin pie filling ingredients. (Pumpkin, half & half, brown sugar, eggs + yolk, vanilla, cinnamon, cloves, ginger, nutmeg, allspice, and salt).
- Beat with an electric mixer until completely smooth.
- Pour the pumpkin pie filling into the crust. Lightly tap the pie dish onto the counter to remove air bubbles.
- Loosely cover and tent the top of the pie with foil. This prevents the pie from browning too early.
- Important: Place the pie dish on a baking sheet, that way if there's any spills it won't affect the oven.
- Bake for 30 minutes, then remove the foil from the top of the pie. Bake an additional 25-35 minutes, or until the center has set up completely and is firm to touch. The pie will firm up slightly once cooled. Avoid over-baking to prevent cracks from appearing in the pie later on. However, cracks are just cosmetic and you could always cover them up with a pie crust design. Tip: Custard desserts, like pumpkin pie, can sometimes be hard to tell doneness. The pie should "jiggle like Jell-O but not wiggle like a wave".
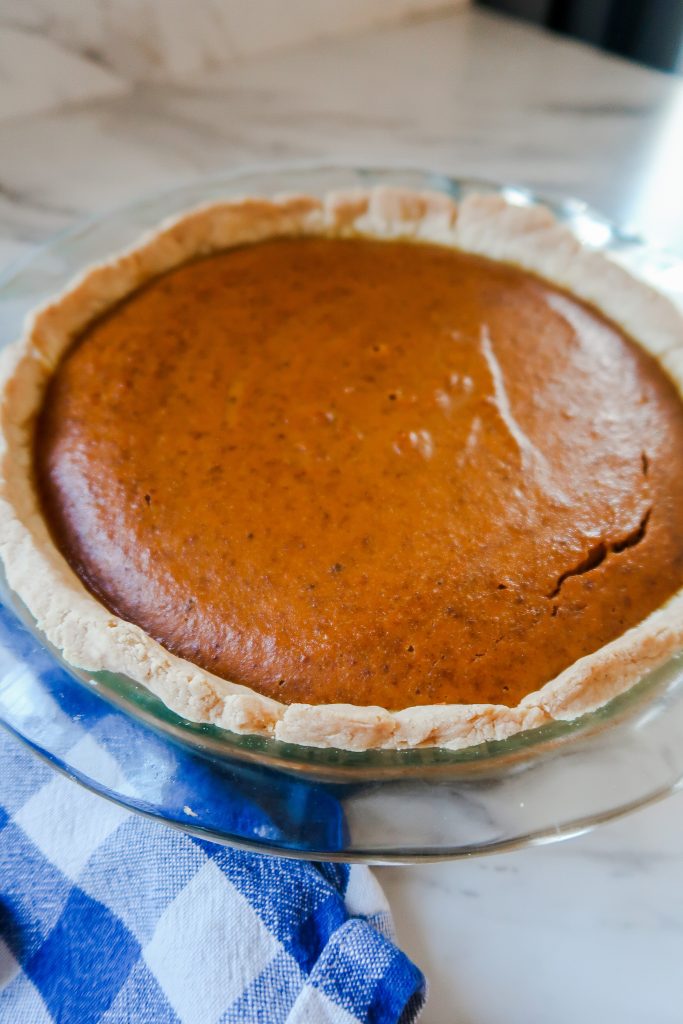
- Allow the pie to cool completely.
- You can refrigerate this pie or leave it out at room temperature. Over here, we prefer our pumpkin pie refrigerated and cold. Eat within 3 days. Serve with whipped cream and a dash of cinnamon.
Did You Make This Gluten Free Pumpkin Pie Recipe? Leave a 5-Star Rating Below!

Pumpkin Pie Recipe with (Optional) Easy Gluten Free Pie Crust
Your rating helps support the making of more tested, delicious gluten-free recipes.
Equipment
- Glass pie dish or ceramic
- Pie weights optional
Ingredients
For the Gluten Free Pie Crust (*One and a half or double recipe if making decorative pie crust shapes):
- 1 ½ cups high-quality gluten-free all-purpose flour containing xanthan gum I used Bob's Red Mill GF 1:1 Baking Flour (the blue bag)
- 1 stick unsalted butter (or ½ cup) cold, cut into small pieces
- 3-5 tablespoon milk cold
- ½ teaspoon salt
For the Pumpkin Pie Filling:
- 1 15 oz. can 100% pumpkin puree (not pumpkin pie filling)
- ½ cup light brown sugar packed
- ½ cup half & half
- 2 eggs + 1 egg yolk
- 2 teaspoon pure vanilla extract
- 1 teaspoon ground cinnamon
- ¼ teaspoon ground ginger
- ¼ teaspoon ground nutmeg
- ¼ tsp ground cloves
- ⅛ teaspoon ground allspice
- ½ teaspoon salt
Instructions
For the Gluten Free Pie Crust:
- Prepare a 10-inch pie pan by greasing it with a pat of butter or cooking spray.
- Combine flour and salt in a medium-sized mixing bowl.
- Cut butter into flour mixture until the butter resembles small peas. Add the milk in intervals, a few tablespoons at a time. Work the milk into the flour and butter mixture until it forms a ball. If the flour is too dry and crumbly, add a tablespoon more milk at a time.
- Once the dough has formed a ball, cut two large pieces of parchment or wax paper. Lay the first piece of parchment paper on the countertop, and place the dough ball on top of it. Then, lay the second piece of parchment paper on top of the dough ball. Use a rolling pin to roll out the dough until it's about 10 inches across, in length and width.
- After the dough has been rolled out, peel back the top layer of parchment paper and discard. Then, place the prepared pie pan on top of the dough. Place one hand under the bottom layer of parchment paper and one hand on the bottom of the pie pan. Flip the pie pan so it's right-side up and the pie crust is inside. Carefully press down into shape and peel back the parchment paper. Smooth over any cracks in the pie crust. You can also pinch a design into the edges of the crust.
- Important: Do not pre-bake this pie crust. Leave raw and set aside.
To Make Decorative Pie Crust Shapes:
- Roll out half the dough to ¼-inch to ½-inch thick. Press miniature cookie cutters into the dough to make shapes, then pull away the scraps. You can re-roll the scraps and re-cut more shapes as needed.
- Important: Do not bake decorative pie crust shapes on top of the pie. They will sink into the pumpkin pie filling, move around, etc. Instead, bake decorative pie crust shapes on a separate sheet pan. After the pumpkin pie has cooled, then you can place the (cooled) decorative pie crust shapes onto the pumpkin pie in any pattern you like.
For the Pumpkin Pie Filling:
- Preheat oven to 350 F.
- In a large-sized mixing bowl or bowl of a stand mixer, add all of the pumpkin pie filling ingredients. Beat with an electric mixer until completely smooth.
- Pour the pumpkin pie filling into the crust. Lightly tap the pie dish onto the counter to remove air bubbles.
- Loosely cover and tent the top of the pie with foil. This prevents the pie from browning too early.
- Important: Place the pie dish on a baking sheet, that way if there are any spills it won't affect the oven. Bake for 30 minutes, then remove the foil from the top of the pie. Bake an additional 25-35 minutes, or until the center has set up completely and is firm to touch. The pie will firm up slightly once cooled. Avoid over-baking to prevent cracks from appearing in the pie later on. However, cracks are just cosmetic and you could always cover them up with a pie crust design. Tip: Custard desserts, like pumpkin pie, can sometimes be hard to tell doneness. The pie should "jiggle like Jell-O but not wiggle like a wave".
- Allow the pie to cool completely. You can refrigerate this pie or leave it out at room temperature. Eat within 3 days. Serve with whipped cream and a dash of cinnamon.


Leave a Reply